

How To Change Admin Settings On Windows 10
You can create a local user account (an offline business relationship) for anyone who will frequently use your PC. The best option in nearly cases, though, is for everyone who uses your PC to accept a Microsoft account. With a Microsoft business relationship, you lot tin access your apps, files, and Microsoft services across your devices.
If needed, the local user account can take administrator permissions; however, information technology'southward amend to just create a local user account whenever possible.
Caution:A user with an administrator account tin can access anything on the system, and any malware they come across can apply the administrator permissions to potentially infect or damage any files on the arrangement. Only grant that level of access when absolutely necessary and to people you trust.
As you create an account, remember that choosing a password and keeping it condom are essential steps. Because nosotros don't know your password, if you lot forget information technology or lose it, we can't recover it for you.
Create a local user account
-
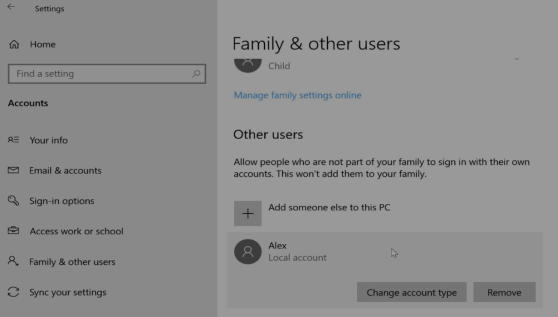
Select Beginning >Settings > Accounts so selectFamily & other users. (In some versions of Windows you'll seeOther users.)
-
Side by side to Add other user, select Add together account.
-
Select I don't have this person'due south sign-in information, and on the next folio, select Add a user without a Microsoft account.
-
Enter a user name, password, or password hint—or choose security questions—and and so select Side by side.
Open Settings and create another account
Modify a local user account to an ambassador business relationship
-
Select Start >Settings > Accounts.
-
UnderFamily & other users, select the account possessor name (yous should see "Local account" below the proper name), then select Change account type.
Notation:If you choose an account that shows an email address or doesn't say "Local business relationship", then you're giving administrator permissions to a Microsoft account, non a local account.
-
Under Account type, select Administrator,and so selectOK.
-
Sign in with the new administrator account.
If y'all're using Windows x, version 1803 and later, you tin can add together security questions as you lot'll see in step 4 nether Create a local user account. With answers to your security questions, yous tin can reset your Windows x local account countersign. Not certain which version you have? You can check your version.
Create a local user account
-
Select Showtime >Settings > Accounts then selectFamily & other users. (In some versions of Windows you'll seeOther users.)
-
Select Add someone else to this PC.
-
Select I don't have this person's sign-in data, and on the next page, select Add a user without a Microsoft account.
-
Enter a user name, password, or password hint—or choose security questions—and then select Next.
Open up Settings and create some other account
Alter a local user account to an ambassador business relationship
-
Select Start >Settings > Accounts .
-
UnderFamily & other users, select the business relationship owner name (you should encounter "Local Account" below the name), so select Change account type.
Note:If you choose an account that shows an email address or doesn't say "Local business relationship", then y'all're giving administrator permissions to a Microsoft account, not a local account.
-
Nether Account type, select Administrator,and and so selectOK.
-
Sign in with the new ambassador business relationship.
Related topics
Microsoft business relationship help
How to reset your Microsoft account countersign
Get aid with Windows activation errors
Source: https://support.microsoft.com/en-us/windows/create-a-local-user-or-administrator-account-in-windows-20de74e0-ac7f-3502-a866-32915af2a34d
Posted by: willinghammandked81.blogspot.com
0 Response to "How To Change Admin Settings On Windows 10"
Post a Comment